Find Perfect Table Legs for Live Edge Tables 2026

A homeowner gets the slab into the house, leans it against the dining room wall, and realizes the hard part isn't over. It's just starting. The live edge looks dramatic in the afternoon light. The grain has depth, the sapwood pulls the eye, and the outline isn't straight anywhere. Then the practical questions land fast. What legs will hold it? Where do they go when the slab isn't the same width from one end to the other? Will the base look light and elegant, or underbuilt and nervous?
That's why table legs for live edge tops deserve more careful consideration than they often receive. A live-edge slab doesn't behave like a uniform factory top. It carries weight unevenly, moves with the seasons, and asks for a base that respects both structure and character. A good pairing feels settled, grounded, and quiet. A bad one looks fine for a week and starts telegraphing stress through wobble, binding, or hairline cracks.
For homeowners planning a dining table that should age into a family piece, the leg decision isn't cosmetic. It's architectural. The best starting point is to study how finished live edge tables are proportioned before choosing hardware, height, or style.
Introduction to Live Edge Table Leg Selection
A live-edge table succeeds when the base disappears into the experience of using it. Guests sit down without bumping knees. The slab feels steady when someone leans on the edge. The whole piece looks intentional, not like a beautiful top dropped onto whatever legs happened to fit.
That balance is harder to achieve than it looks. Natural slabs carry bark pockets, changing thickness, and irregular contours that shift the visual center away from the true center of mass. A straight-edged dining top gives a builder predictable reference points. A live-edge slab rarely does.
Practical rule: Choose the legs after the slab is selected, not before. The wood should dictate the base, not the other way around.
Homeowners often focus first on silhouette. Hairpin legs feel airy. Trestles feel substantial. Pedestals can make a room feel softer and more sculptural. Those choices matter, but the better question comes first. How will this specific slab sit, move, and be used in a real dining room?
A family table in Columbus has to do more than photograph well. It has to live through seasonal humidity changes, weeknight dinners, holiday traffic, and chairs sliding in and out. The right base turns a raw slab into furniture. The wrong one turns a strong piece of wood into a long list of corrections.
Choosing Table Leg Styles and Materials
A good leg choice settles the slab. It gives an irregular top a clear stance, keeps the table from feeling visually lopsided, and leaves enough room for knees, chairs, and everyday use. With live edge work, that matters more than style labels.
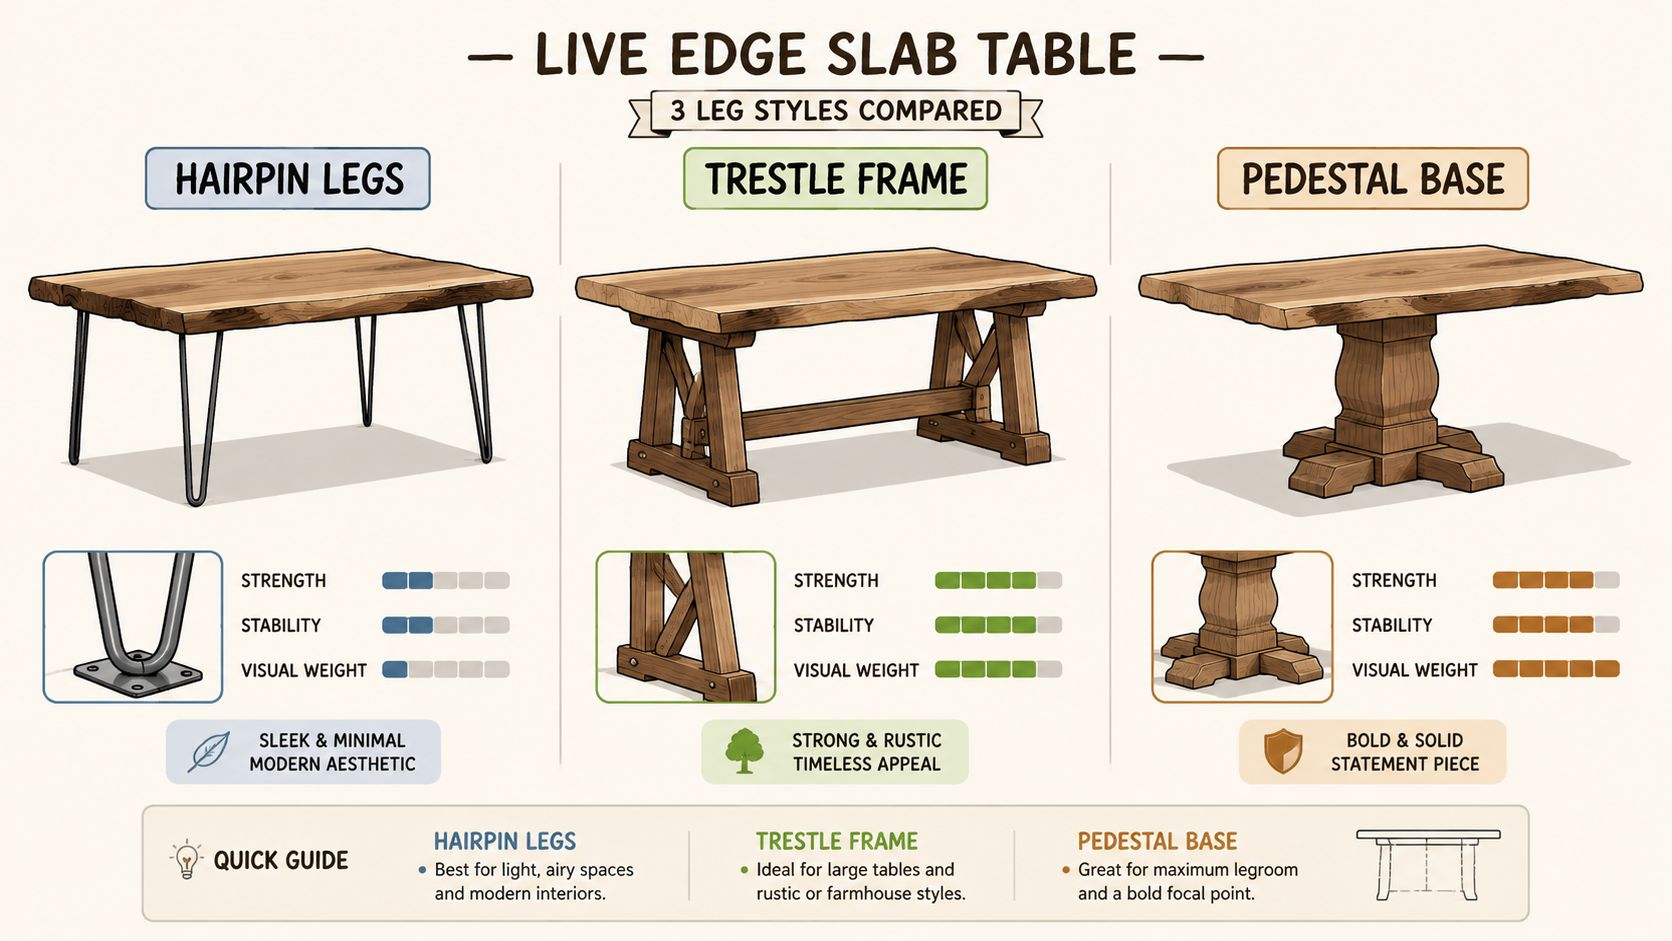
How common leg styles behave
| Leg style | Where it works well | Trade-off to watch |
|---|---|---|
| Hairpin | Modern rooms, slimmer slabs, lighter visual profile | Can look underscaled under a thick or visually heavy slab |
| Trestle | Larger dining tables, rustic-modern interiors, strong stance | Adds more visual weight and needs careful chair clearance planning |
| Pedestal | Sculptural spaces, softer traffic flow around chairs | Demands careful balancing under irregular tops |
Hairpin legs work best when the slab is relatively restrained. On a narrow walnut top with clean lines, they keep the room open and let the edge profile stand out. Under a thick slab with one side that flares wider than the other, they often read too slight. The table may still be structurally sound, but it can look top-heavy before anyone even sits down.
Trestle bases solve many of those visual problems. They give a long slab a grounded center and usually feel better under hand and under load. The trade-off is space. Crossmembers, feet, and end posts can interfere with chair placement if the base is oversized or pushed too far toward the ends.
Pedestal bases handle traffic well because there are fewer corners for feet and chair legs to fight. They also ask more of the installer. A live-edge slab rarely has perfect symmetry, so the pedestal has to be placed for actual balance, not just visual center.
Adjustable floating-mount systems are showing up more often for that reason. They give a builder some side-to-side and front-to-back forgiveness when the slab edge wanders or the thickness changes from one end to the other. On a difficult slab, that adjustability can save a design that would look awkward with fixed plates locked to a strict rectangle.
Why material choice changes the feel of the table
Wood legs and metal legs solve different problems.
A solid wood base feels warmer, softer, and more traditional under a live-edge top. It also adds mass, which helps a dramatic slab feel intentional instead of perched. Maple and oak are dependable choices when the goal is stiffness and long-term durability. Walnut reads richer and quieter, but the base design still has to carry the load. Species alone will not fix a weak layout.
Metal bases bring sharper lines and usually more visual contrast. They pair well with slabs that have a lot of figure or irregular movement because the steel can act as a calm frame around the wood. Homeowners trying to balance those materials can get useful ideas from this guide to metal accents in furniture design.
The primary trade-off is feel. Steel can make a slab look lighter, but thin steel under a thick, wild-edged top sometimes feels cold or underbuilt. Wood can make the piece feel settled, but a bulky wood base under an already heavy slab can crowd the room.
I usually tell homeowners to look at the slab from ten feet away, then from the chair. From across the room, ask whether the base calms the shape of the top. From the seat, ask whether it feels comfortable, planted, and believable.
A live-edge slab already carries enough motion. The legs should give it structure.
For rooms with a mix of wood furniture, leather seating, stone, or painted cabinetry, the base does not need to match every material in the house. It needs to belong with them. That usually means choosing a leg style and material that support the slab's irregular geometry instead of competing with it.
Measuring Dimensions and Weight Capacities
A live-edge table can look perfect and still be wrong on paper. Most installation problems begin with three missed measurements. Finished height, base spread, and chair clearance. If those aren't sorted before drilling, the project becomes guesswork.
Get the dining height right first
Standard dining height for live-edge furniture sits between 29 and 30 inches from the floor, according to this live-edge dining table buying guide. Because slabs can range from 1.5 inches to 3 inches or more in thickness in that same guide, leg length has to be chosen after the slab is measured, not estimated from a product photo.
That same guide notes that threaded leg levelers usually provide about 0.5 inches of vertical adjustment. That small adjustment range is useful, but it won't rescue a bad height calculation.
Use the width of the slab to size the base
The most important stability rule is the 2/3 Width Rule. The foundational safety standard for table legs supporting live-edge slabs is the 2/3 Width Rule, mandating the base width at the floor be at least two-thirds, 60 to 70 percent, of the slab's total width to prevent tipping and ensure stability when a user leans on the edge.
A useful example comes from that same source. A 40-inch wide live-edge table needs a base width of about 26 to 28 inches.
| Base Width Requirements by Slab Width | Min Base Width |
|---|---|
| 40 inches | 26 to 28 inches |
That rule matters even more with species that carry visible contrast between heartwood and sapwood, because the slab may not distribute mass evenly from edge to edge.
If the slab feels visually wild, the base usually needs to be visually and structurally calmer.
Leave room for chairs to work naturally
The dining guide linked earlier also notes that there should be at least 16 inches from the end of the table to the front of the leg for comfortable chair access, increasing to 18 to 20 inches on tables over eight feet. That same source says a 72-inch table seats three and a 96-inch table seats four along one side.
Before layout, homeowners should verify room dimensions and user clearances with a practical measuring approach such as this furniture measuring guide. A beautiful table still has to let people sit down comfortably.
Selecting Mounting Hardware and Patterns
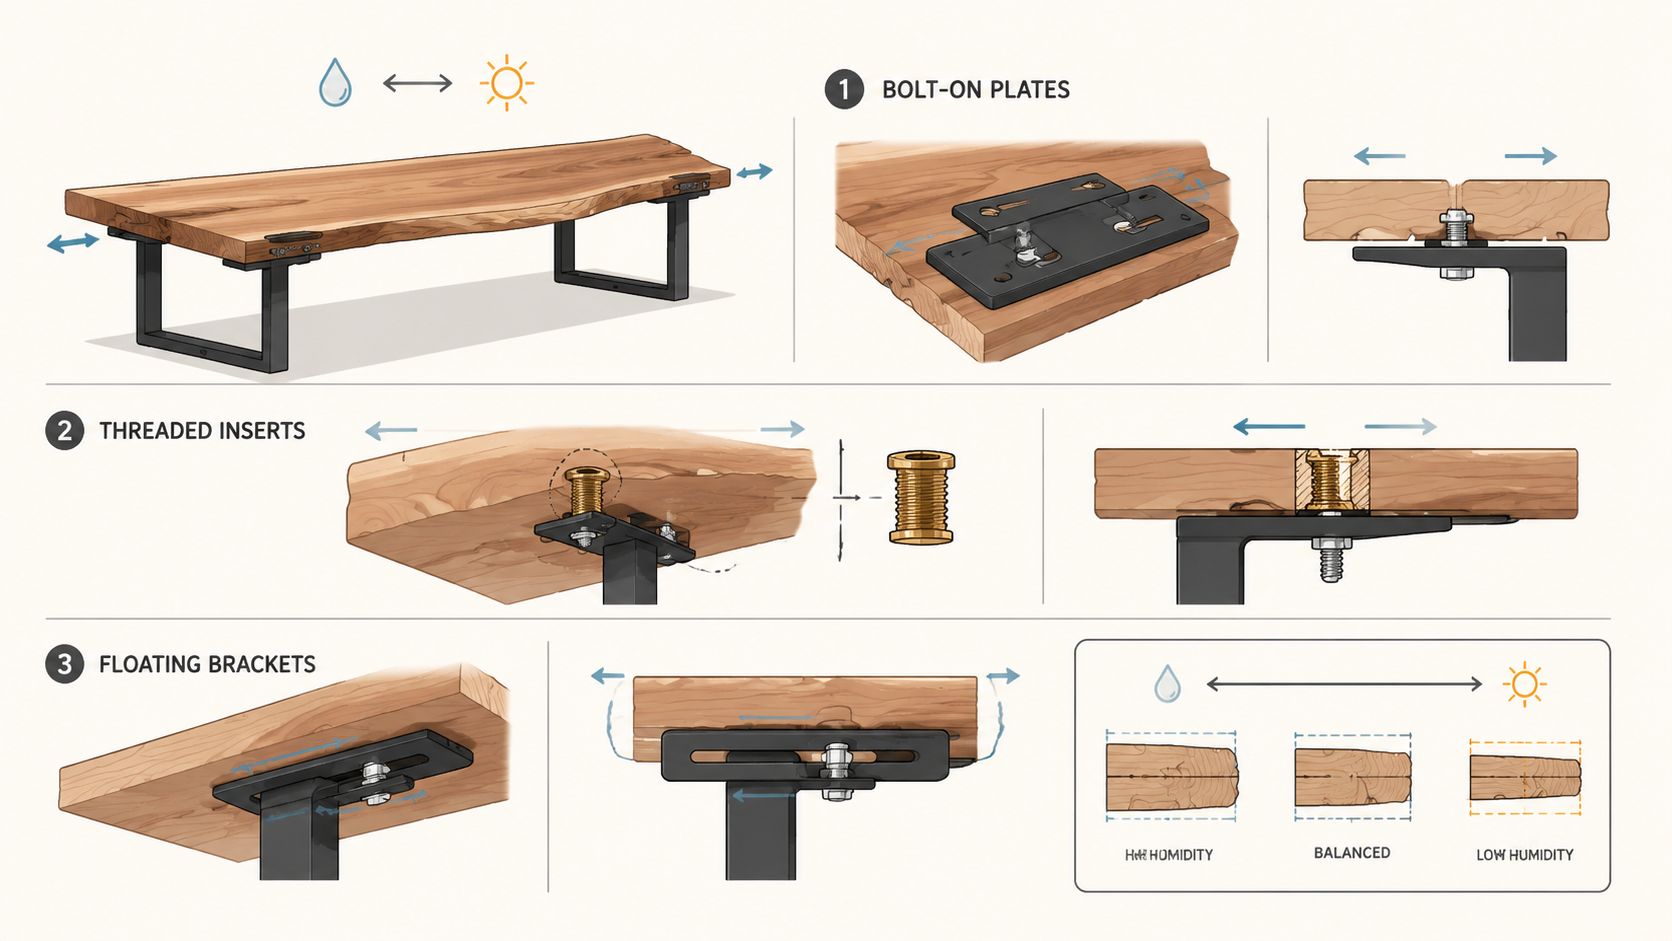
The best-looking leg can still fail if the mounting method fights the wood. Live-edge slabs expand and contract. Hardware has to hold firmly while still letting the slab breathe. Rigid attachment looks strong on day one and can become the reason a top splits later.
What works and what usually doesn't
Direct bolt-on plates are common because they're simple. For a stable slab in a controlled room, they can perform well enough. The risk is that they lock the base too tightly to a top that wants to move seasonally.
Threaded inserts are a better choice when a homeowner wants cleaner serviceability and more controlled fastening pressure. Floating brackets go further by allowing small lateral movement rather than forcing the slab to stay fixed in one exact position.
A useful benchmark comes from this live-edge build resource. New data shows 34% of professional woodworkers now recommend threaded inserts with intentional play or floating brackets to allow 1/8 to 1/4 inch of lateral movement, mitigating stress from wood movement in live-edge slabs.
Comparing mounting patterns
- Corner plate mounting works on straightforward bases and gives a clean install, but it's less forgiving when the slab width changes noticeably.
- Midrail support patterns spread attachment over a longer area and often feel steadier on longer dining tops.
- Floating-mount systems reduce stress where the wood is likely to shift, especially on expressive slabs with active grain and irregular edges.
The hardware should restrain the table, not strangle the wood.
Another detail from the same source matters in practice. Some builders intentionally back off the hardware slightly rather than torquing every fastener as tight as possible. That restraint often leads to a longer-lived table because the slab can move without turning the fastener points into stress points.
For homeowners who want a bench-made result, this is one of the clearest dividing lines between decorative assembly and proper furniture construction.
Installing Table Legs Under Live Edge Slabs
Installation starts with observation, not drilling. A live-edge slab almost never gives a perfect visual centerline, and using a standard template can push the base into the wrong position. The eye wants symmetry. The slab often needs offset.
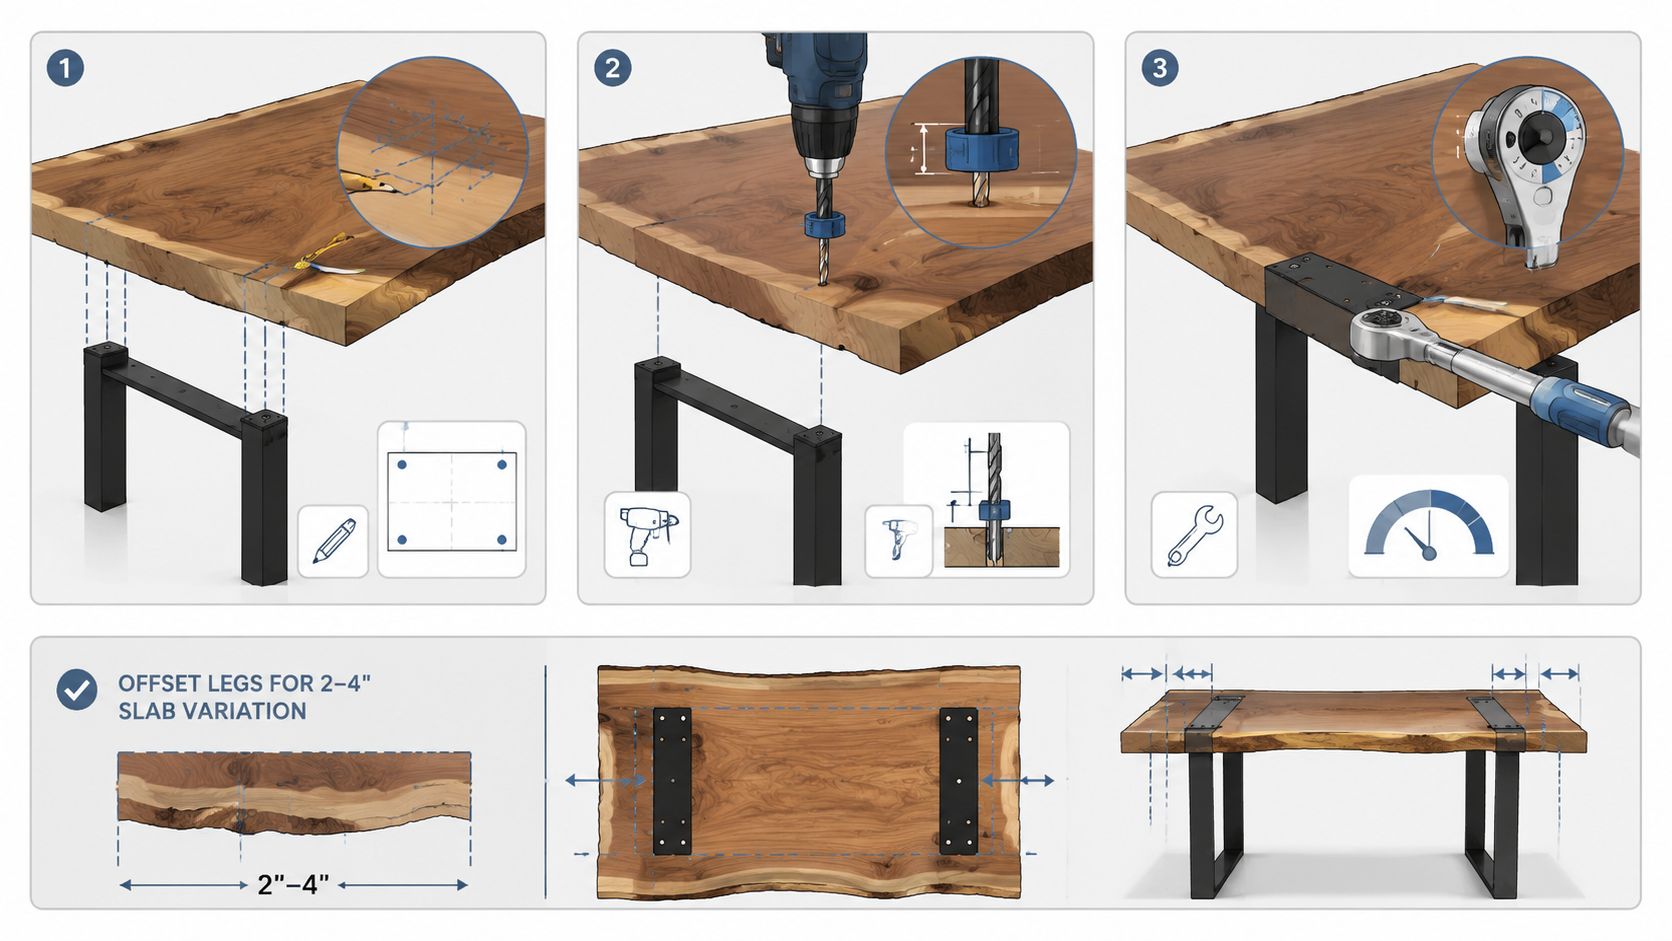
Step one, mark from usable edges, not bark alone
Set the slab upside down on padded supports. Find the dining center by balancing three references:
- The visual center of the top.
- The widest and narrowest points.
- The seating zone, not just the outer edge.
A slab can present a dramatic bark line that shouldn't be treated as a structural datum. If one side sweeps outward more than the other, centering the legs between bark edges can leave the table feeling off-balance in use.
Step two, account for irregular width before drilling
Many DIY builds encounter difficulties with live-edge slab variations. Live-edge slabs vary in width by 2 to 4 inches across their length, requiring offset leg placement that standard mounting templates don't support. Omitting this adjustment leads to cupping or cracking when seasonal expansion shifts the slab unevenly relative to rigid legs.
That means the base may need to be shifted slightly from what a symmetrical template suggests. The goal is equal function, not fake symmetry.
Use a simple dry layout before committing:
- Place the base upside down under the slab and check how each leg relates to the seating area.
- Measure from multiple points along the live edge, not from a single straight-line assumption.
- Check overhang by eye and by tape. If those two readings disagree, trust the one that preserves usable space and visual balance.
A live-edge slab should look settled on its base from every walking angle, not just from directly overhead.
Step three, drill and fasten with restraint
Pilot holes matter. They guide the fastener, reduce tear-out, and lower the risk of splitting at attachment points. A sacrificial guide under the drill path helps keep the work clean, especially on figured hardwood.
After the pilot holes are in place:
- Mount loosely first so the whole base can still be nudged into final position.
- Check for rocking on the floor before final tightening.
- Snug the hardware evenly rather than fully tightening one corner at a time.
- Shim where the underside is uneven if bark contours or natural undulation leave a gap between plate and slab.
When the table is assembled, it's worth revisiting alignment after the first seasonal change indoors. Wood settles into the home. Fasteners should be checked, not assumed.
Homeowners who don't want to wrestle with slab handling and precise placement should consider professional furniture assembly and installation, especially for heavier dining tops that need careful in-home setup.
Finishing Touches and Maintenance Tips
A live-edge table doesn't feel complete when the legs are merely attached. It feels complete when the underside is tidy, the hardware disappears into the design, and the piece sits level without fuss. Those last details are what separate a project table from a lasting dining table.
Small finishing details that improve the whole piece
Exposed fastener heads can be toned to blend better with the base finish. That's especially useful when dark metal hardware interrupts a quieter wood palette. Cut edges around drilled areas should also be sealed or finished cleanly so the underside ages as well as the top.
Leveler feet deserve attention too. They solve minor floor variation, but they can loosen over time as the table is moved for cleaning.
- Check level seasonally so one leg doesn't begin carrying more load than the others.
- Wipe metal bases with a soft cloth and keep moisture from sitting at welds or corners.
- Use touch-up products sparingly. The goal is maintenance, not building up a thick patch.
Protect the slab and the base over time
Sunlight is often harder on a live-edge table than daily use. Homes with strong window exposure may benefit from a finish system designed for added UV defense. For homeowners researching protective topcoats in harsher light conditions, UV-resistant epoxy coatings can help frame the conversation around finish durability and exposure.
Regular care still matters more than any product label. Dust with a soft cloth, clean gently, and avoid letting spills sit around natural checks or porous areas of the edge. Practical maintenance guidance like this wood furniture care guide helps homeowners keep both the slab and the base looking bench-made rather than tired.
Maintenance on a live-edge table is less about constant work and more about consistent attention.
The reward is tactile. Solid wood keeps its depth. The base stays quiet under load. The table continues to feel like a serious piece of furniture instead of a project that was finished once and forgotten.
Cost Estimates and When to Consult Professionals
A live-edge table gets expensive fast when the base is purchased before the slab is fully assessed. I see the same pattern over and over. A homeowner falls for a leg style, then finds out the underside is cupped, the live edge pushes the visual center off line, or the slab needs an adjustable floating-mount system instead of a fixed plate. The second round of buying costs more than getting the plan right the first time.
Budget the project as one build. Include the slab, the base, mounting hardware, finish work, delivery, and labor if the top is too heavy to handle safely in a home shop or garage.
When DIY still makes sense
DIY works well when the slab is moderate in weight, the underside gives you enough flat bearing surface, and the leg layout is already clear before holes are drilled. A straightforward install stays affordable because there are fewer corrections. You are not paying to slot plates, shim around twist, or remake a steel part that looked right on paper but sits wrong under a natural edge.
Adjustable floating-mount systems have changed the math for some homeowners. They cost more than basic fixed brackets, but they can save a project when the slab moves seasonally or the underside is irregular enough that a rigid mount would force stress into the wood. On a slab with uneven thickness or a wandering edge line, that extra adjustment range can be money well spent.
When professional help is the better value
Professional help earns its keep when fit and alignment matter more than the price of the legs alone.
- The slab is irregular enough that placement must be judged from several sightlines. Centering by tape measure alone often looks wrong on a live edge.
- The base needs custom steel work or revised mounting points. A shop that handles made-to-fit fabrication, such as Rusted Rooster Fab welding, can help sort out plate size, stance, and attachment details before holes are drilled in the slab.
- The top is large, thick, or unusually heavy. Flipping, positioning, and final leveling can turn into a safety problem without proper help.
- The room itself creates installation issues. Uneven floors, tight stair runs, and narrow doorways can change what base style is practical.
There is also a point where design and construction overlap. A dining table may need to coordinate with other solid-wood pieces or upholstered seating nearby, but the main priority is still function. Knee clearance, chair spacing, and foot placement matter more than matching a photo online. Good professionals catch those details before the table is built, not after it starts bumping shins or rocking on one corner.
Custom pricing varies with material, fabrication time, finish requirements, and how much correction the slab needs before the base can go on. Simpler jobs stay close to the cost of the parts. Irregular slabs, custom steel, and adjustable mounting systems push the price higher because they add layout time and trial fitting. If the piece is meant to last for decades, paying for accurate fabrication and a clean install usually costs less than repairing split screw holes, bent plates, or a base that never quite sits quiet under load.